Nizar Mohd - Project Portfolio Page
Project: OrgaNice!
Overview
OrgaNice! is a command line based application that can help academics with scheduling their tasks and keeping track of them. It also has additional features such as note taking and finding study areas within NUS, to help academics.
Summary of Contributions
Code Contributed
Link : RepoSense Dashboard
Enhancements implemented:
- Major Enhancement: added the ability to search for study areas based on User’s criteria.
- What it does: It allows user to obtain a list of study areas that meets the criteria entered by the user. Supported criteria includes name, address, faculty, port availability, environment and capacity.
- Justification: This feature forms one of the intended features of OrgaNice and it gives Students the awareness on actual study areas that they can use to study, if they are new to the faculty or just unfamiliar with NUS.
- Highlights: This feature supports lose search when searching by name, address or faculty. Meaning user can enter commonly used abbreviations for locations and still return a result. For example, Starbucks is commonly known as bux or bucks in the current era, and allowing the user to search with the commonly used abbreviations allows for ease of use on the user end. This utilised HashMap to create a mapping between the commonly used abbreviations to the actual attributes of the locations stored in our data files.
- Credits: The algorithm currently used was suggested by one of our Team Member, Terry. He gave me a verbal idea of the algorithm which allowed me to implement it into code.
- Major Enhancement: added the ability to view Tasks in calendar view.
- What it does: Allows user to take a glance on the list of tasks available in a month period (specified by the User).
- Justification: This feature improves the product visually, and gives the User ease of access and visibility of the task they have for an entire month.
- Highlights: The user can view the tasks for any month that they desire, present or future only. The difficulty comes when we have to print the day of the month at the correct boxes and according to the actual day of the week. Next was to print the content such that it does not cause any mismatch in the alignment of Calendar view. Therefore, we only decided to print a maximum of four tasks per day with each tasks detail not exceeding 25 characters. Any details that exceed will have its last three characters (of the 25) displayed as ellipses.
- Minor Enhancement: added the ability to mark deadlines as done, by extension, adding a boolean attribute, isDone, to Deadline class.
- Minor Enhancement: added the ability to print messages in a specific format, which is with indentation and of a fixed length.
- Credits: The implementation of the code was extracted from stackOverflow
- Contributions to UG
- Documented the for features (3.13 & 3.15)
- Added some details for FAQ (Q1 , 3 & 5)
- Contributions to the DG
- Documented Table of Contents, styling of images using css and numbering of figures.
- Documented the Study Area Component. This includes the documentation of the Object Diagram for the Study Area Component.
- Documented the implementation for study area search feature and the Sequence Diagram to show the implementation.
- Documented Non-Functional Requirements.
- Documented Glossary.
- Documented Testing.
- Contributions to team-based tasks :
- Assisted with integration of the forking workflow during the earlier stage, as there were mismatch after resolving merge conflicts.
- Refactored code by removing some of the magic literals into constants and moving constants into its own class, Constant class.
- Assisted with the Ui of the system by integrating Ui to classes that requires communication with the user.
- Obtained the design for logo and goodbye dab. Credits: Generator for logo, image source for goodbye dab, generator for goodbye dab
- Added test cases using JUnit for study area command, calendar view and study area list.
- Review/mentoring contributions:
- Contributions beyond the project team:
- Reported 6 bugs during the PE Dry Run.
- Reviewed another team’s DG
Contributions to User Guide (Extract)
This section is extracted to show a sample documentation that I have done for the User Guide.
3.13 Study Area Search Feature
You can search for study areas based on criteria that you desire by using this feature. You are free to loosely search. For example, if you enter as this, you will receive a list of places related to the name Starbucks as “bux” is a common abbreviation used for it.
3.13.1 Entering Study Area Search Interface
To enter the Study Area search interface, you can enter ‘study’ in the main interface. You will then be guided to the study area search interface.
Usage
Example of usage:
study
Expected Outcome:
________________________________________________________________________________________________
     Please enter the location for your desired study area.
     Enter "help" for a list of supported flags. Flags should
     only come after location, if a criteria for location is
     entered. When you are done with the search, enter "bye".
________________________________________________________________________________________________
3.13.2 Start Search
You can start the search by entering the criteria desired. Supported criteria include name, address, faculty, ports availability, environment and size capacity. For name, address or faculty, you simply have to enter it as a string. For other supported conditions, flags have to be used.
Below are the supported flags:
- -s {size} : To locate a study area that can facilitate the size of pax entered.
- -p : To locate a study area based on the availability of ports.
- -i : To locate a study area that are indoors.
- -o : To locate a study area that are outdoors.
Note:
{name\address\faculty} {flags} is the basic format to search for Study Areas. You can enter either argument, or both. If both arguments are specified, flags will have to precede either the name,address or faculty.
Usage
Search by name, address or faculty
Example of usage:
bux
Expected Outcome:
________________________________________________________________________________________________
     Here are the available study areas!
     __________________________________________________________
     Name: Opposite Town Green (Outside Starbucks)
     Address: 2 College Avenue West Education Resource Centre,
     Ground Level
     Faculty: Utown
     Port: true
     Indoor: false
     Maximum number of Pax: 4
     __________________________________________________________
     __________________________________________________________
     Name: Starbucks
     Address: 2 College Avenue West Education Resource Centre,
     Ground Level
     Faculty: Utown
     Port: true
     Indoor: true
     Maximum number of Pax: 5
     __________________________________________________________
     Please enter the location for your desired study area.
________________________________________________________________________________________________
Search by name, address or faculty and with flags
Example of usage:
bux -o
Expected Outcome:
________________________________________________________________________________________________
     Here are the available study areas!
     __________________________________________________________
     Name: Opposite Town Green (Outside Starbucks)
     Address: 2 College Avenue West Education Resource Centre,
     Ground Level
     Faculty: Utown
     Port: true
     Indoor: false
     Maximum number of Pax: 4
     __________________________________________________________
     Please enter the location for your desired study area.
________________________________________________________________________________________________
NOTE: When using this format, flags must always come after the location, name or address. Else, the system will return an error message.
Search by flags only
Example of usage :
-s 6
Expected output:
________________________________________________________________________________________________
     Here are the available study areas!
     __________________________________________________________
     Name: EA Level 4
     Address: 9 Engineering Drive 1,EA, Level 4, Outside Staff
     Offices
     Faculty: Engineering
     Port: true
     Indoor: false
     Maximum number of Pax: 6
     __________________________________________________________
     Please enter the location for your desired study area.
________________________________________________________________________________________________
Future Enhancements
The current implementation does not include real-time availability of the study areas. In version 3.0 we hope to be able to retrieve real-time availability of public study areas, like the ones in U-Town. In order to do so we would require access to real-time data like CCTV monitors of the study areas to detect if there is an available seat at a specific point of time at a specific area. Also, due to time constraint, we were not able to gather an exhaustive list for the study area. At version 3.0 we aim to reach full breadth for the data on study areas in NUS.
3.15. Calendar View
3.15.1. Enter Calendar
Example of usage:
calendar
Expected output:
________________________________________________________________________________________________
     Enter the month and year that you wish to see:
________________________________________________________________________________________________
3.15.2. Enter Desired Month to View
To view tasks for current month
Example of usage:
now
Expected output:
________________________________________________________________________________________________
Tasks for: APRIL, 2020
-----------------------------------------------------------------------------------------------------------------------------------------------------------------------------------------------------
|SUN                        |MON                        |TUE                        |WED                        |THU                        |FRI                        |SAT                        |
-----------------------------------------------------------------------------------------------------------------------------------------------------------------------------------------------------
|                           |                           |                           |                          1|                          2|                          3|                          4|
|                           |                           |                           |                           |                           |                           |                           |
|                           |                           |                           |                           |                           |                           |                           |
|                           |                           |                           |                           |                           |                           |                           |
|                           |                           |                           |                           |                           |                           |                           |
-----------------------------------------------------------------------------------------------------------------------------------------------------------------------------------------------------
|                          5|                          6|                          7|                          8|                          9|                         10|                         11|
|                           |                           |                           |                           |                           |                           |                           |
|                           |                           |                           |                           |                           |                           |                           |
|                           |                           |                           |                           |                           |                           |                           |
|                           |                           |                           |                           |                           |                           |                           |
-----------------------------------------------------------------------------------------------------------------------------------------------------------------------------------------------------
|                         12|                         13|                         14|                         15|                         16|                         17|                         18|
|                           |                           |                           |                           |                           |                           | [D][N] submit cg2028 r... |
|                           |                           |                           |                           |                           |                           |                           |
|                           |                           |                           |                           |                           |                           |                           |
|                           |                           |                           |                           |                           |                           |                           |
-----------------------------------------------------------------------------------------------------------------------------------------------------------------------------------------------------
|                         19|                         20|                         21|                         22|                         23|                         24|                         25|
|                           |                           |                           |                           |                           |                           |                           |
|                           |                           |                           |                           |                           |                           |                           |
|                           |                           |                           |                           |                           |                           |                           |
|                           |                           |                           |                           |                           |                           |                           |
-----------------------------------------------------------------------------------------------------------------------------------------------------------------------------------------------------
|                         26|                         27|                         28|                         29|                         30|                           |                           |
|                           |                           |                           |                           |                           |                           |                           |
|                           |                           |                           |                           |                           |                           |                           |
|                           |                           |                           |                           |                           |                           |                           |
|                           |                           |                           |                           |                           |                           |                           |
-----------------------------------------------------------------------------------------------------------------------------------------------------------------------------------------------------
________________________________________________________________________________________________
To view tasks for future months
NOTE:
- Input for both month and year must be integers.
- This feature only supports the current and future months.
- Any details that exceed the limit within the designated box for the day, will have the last three displayed characters as ellipses.
Example of usage:
5 2020
Expected output:
________________________________________________________________________________________________
Tasks for: MAY, 2020
-----------------------------------------------------------------------------------------------------------------------------------------------------------------------------------------------------
|SUN                        |MON                        |TUE                        |WED                        |THU                        |FRI                        |SAT                        |
-----------------------------------------------------------------------------------------------------------------------------------------------------------------------------------------------------
|                         31|                           |                           |                           |                           |                          1|                          2|
|                           |                           |                           |                           |                           |                           | [E] cs2113 final exam     |
|                           |                           |                           |                           |                           |                           |                           |
|                           |                           |                           |                           |                           |                           |                           |
|                           |                           |                           |                           |                           |                           |                           |
-----------------------------------------------------------------------------------------------------------------------------------------------------------------------------------------------------
|                          3|                          4|                          5|                          6|                          7|                          8|                          9|
|                           | [D][N] math assignment    |                           |                           |                           |                           |                           |
|                           | [D][N] physics assignm... |                           |                           |                           |                           |                           |
|                           |                           |                           |                           |                           |                           |                           |
|                           |                           |                           |                           |                           |                           |                           |
-----------------------------------------------------------------------------------------------------------------------------------------------------------------------------------------------------
|                         10|                         11|                         12|                         13|                         14|                         15|                         16|
|                           |                           |                           |                           |                           |                           |                           |
|                           |                           |                           |                           |                           |                           |                           |
|                           |                           |                           |                           |                           |                           |                           |
|                           |                           |                           |                           |                           |                           |                           |
-----------------------------------------------------------------------------------------------------------------------------------------------------------------------------------------------------
|                         17|                         18|                         19|                         20|                         21|                         22|                         23|
|                           |                           |                           |                           |                           |                           |                           |
|                           |                           |                           |                           |                           |                           |                           |
|                           |                           |                           |                           |                           |                           |                           |
|                           |                           |                           |                           |                           |                           |                           |
-----------------------------------------------------------------------------------------------------------------------------------------------------------------------------------------------------
|                         24|                         25|                         26|                         27|                         28|                         29|                         30|
|                           |                           |                           |                           |                           |                           |                           |
|                           |                           |                           |                           |                           |                           |                           |
|                           |                           |                           |                           |                           |                           |                           |
|                           |                           |                           |                           |                           |                           |                           |
-----------------------------------------------------------------------------------------------------------------------------------------------------------------------------------------------------
________________________________________________________________________________________________
3.15.3 To escape from Calendar View Command
In any case that you wish not to exit calendar mode after entering it, you can enter “bye” to exit.
Example of usage:
bye
Expected output:
________________________________________________________________________________________________
     You are now back in main interface. Enter "help" for a
     list of supported commands
________________________________________________________________________________________________
Contributions to the Developer’s Guide (Extracts):
The sections I contributed to in the Developer’s Guide are as follows. Note that the content below just shows an extract of the documentation I have done. The purpose of the extract is to show my documentation capability.
Extract 1 (Class Diagram)
2.3. Study Area Component
2.3. Study Area Component
The Study Area component depends on 3 other components,
-
Command Component - The Command component issues instructions for the Study Area component to execute based on the user’s input.
-
UI Component - The UI component is used to display the results (and related exceptions) of the commands issued to the Study Area Component.
-
ResourceLoader Component - The ResourceLoader component is used to load data of all existing Study Areas in NUS into text files when the User first run the software. Eventually, data will be referred from the created text file.
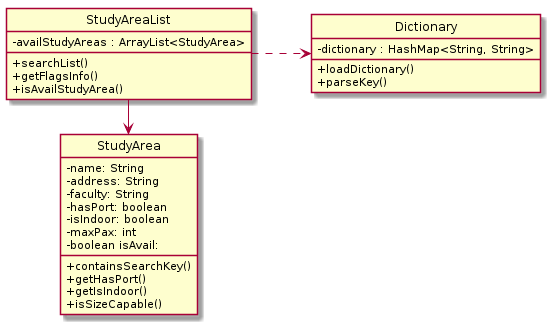
The Study Area component contains 3 separate classes. They are as follows:
-
Dictionary: Class to map user input to specific terms used in StudyAreaList.
-
StudyArea: Class that is used to model Study Areas.
-
StudyAreaList: Class that handles the list of available Study Areas based on User input.
Details on the methods are listed in the glossary
Extract 2 (Sequence Diagram)
3.2. Listing Study Areas
3.2.1 Implementation
The Study Area search is facilitated by StudyAreaList. In this class, it has the list of all existing Study Areas, stored internally as an ArrayList. This ArrayList is called studyAreaList.
To list the Study Area, we iterate through the entire list of all existing Study Area and conduct a check. The check is as follows :
If in each Study Area, the Study Area meets all the flags stated by the User, the Study Area is then added to the list of available Study Area. If not, the iteration is skipped and move on to the subsequent Study Area.
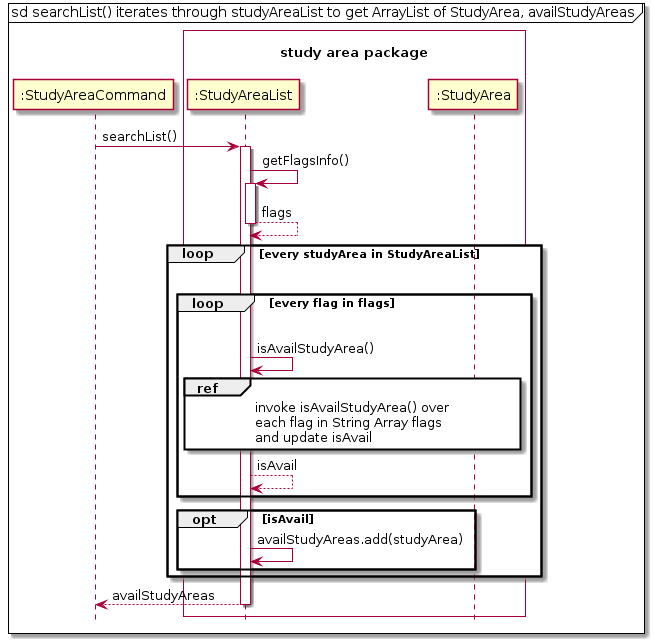
To do as mentioned above, the StudyAreaList class implements the following main methods :
- searchList() :
- This method will iterate through all the Study Areas in the ArrayList studyAreaList while calling other methods to fulfil the search requirements. Once process has ended, the method will return a list of the Study Area, availStudyArea, that meets the User requirement.
- getFlagsInfo() :
- This method will retrieve the flags entered by User, at the same time validating the User input. The criteria entered by the User will be returned as flags, an Array of Strings of fixed size 5 as the software only supports 5 flags in version 2.
- isAvailStudyArea() :
- This method does the check mentioned above and returns a boolean value. Based on the flags detected, the method will iterate through the flags array and check if the Study Area’s attribute match each flag stated in flags. If isAvailStudyArea returns as true for all flags, the Study Area is then added to the output list, availStudyArea.
Below would be a sequence diagram to demonstrate how the search algorithm is operated.
User enters search key
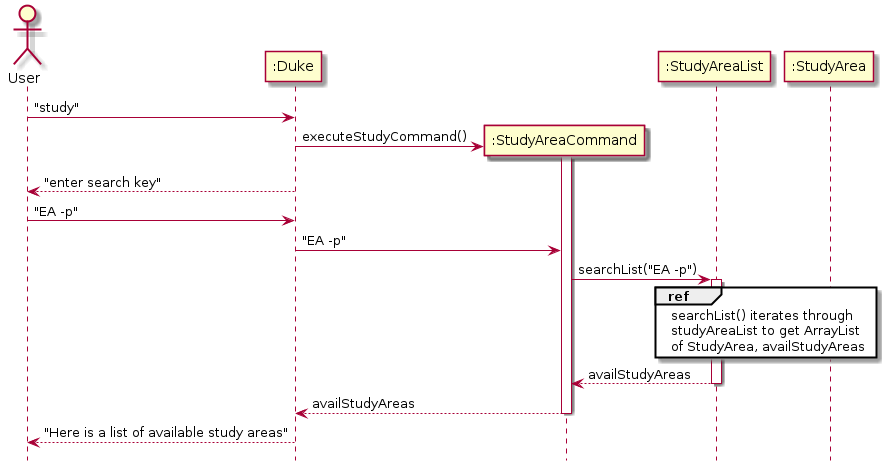
StudyAreaCommand invokes searchList() of StudyAreaList
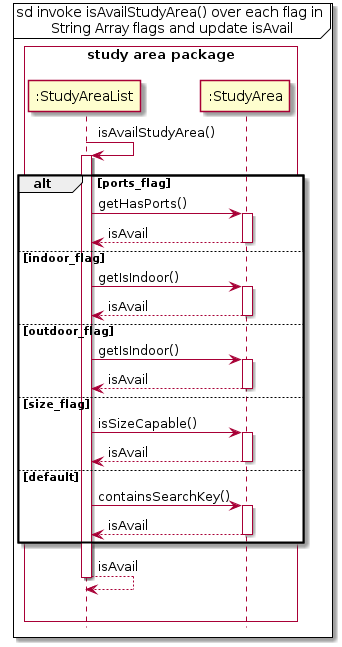
You can refer here for a detailed explanation on the terms used in this diagram
3.2.2 Alternative
Aspect: How to search based on User input.
-
Alternative 1 (Current Choice) :
Iterate through the list of all existing Study Areas. Then check if each Study Area meets User’s Criteria
- Pros: Lesser data structures required. Therefore lesser memory required.
- Cons: Linear search, therefore, with a bigger size of data, the search may take longer.
-
Alternative 2 :
There exist four flags: port availability, indoor, outdoor, capacity. Create adjacency lists that map the flag to the Study Area itself. If the Study Area contains that attribute, the Study Area is added in that specific attribute list. Depending on the type of attribute, the adjacency list can be implemented using different data structures.
For example, let’s take only the two study areas below as the entire data set.
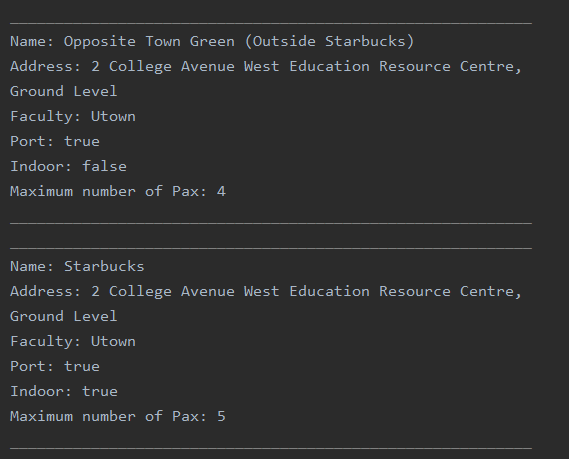
This will result in the following adjacency lists :
Environment:
Indoor -> {Starbucks}
Outdoor -> {Opposite Town Green (Outside Starbucks)}
Data Structure : 2D Array, with only two rows (For indoors and outdoors)
Ports:
Yes -> {Opposite Town Green (Outside Starbucks), Starbucks}
No -> null
Data Structure: 2D Array, with only two rows (For Yes and No)
Capacity:
4 -> {Opposite Town Green (Outside Starbucks)}
5 -> {Starbucks}
Data Structure: HashMap<Integer, ArrayList
The creation and initialisation of the lists are done when the software is setting up. Therefore, each flag has its designated list. Based on user criteria, concatenate an output list with the Study Areas that are found in all of the relevant flag lists stated by the user. If more than one requirement is entered by the user, only the Study Areas appears in all the related attributes specified by the User will be added to the output list.
- Pros: Data is categorised based on flags.
- Cons: More memory is required as more data structures are used. Since methods invoked during the search are also linear, time taken to complete the search will be longer if more data are present. Overall, this approach is harder to implement.
Therefore, the first alternative is chosen, as it is much easier to implement and lesser memory is used while searching
Extract 3 (General Documentation)
4. Testing
Currently, we have two runners to execute the tests, JUnit and Gradle.
Note: It is advisable to run tests with coverage, to ensure that 90% of the paths are covered.
Using IntelliJ JUnit
Firstly check if the configuration, “All in ‘tp.test’” exist. You need to edit a configuration if there isn’t any to run all tests.
To edit a configuration, click Run then click on Edit Configurations. Proceed to click the + icon, followed by JUnit
Afterward, ensure that the configurations are as such:
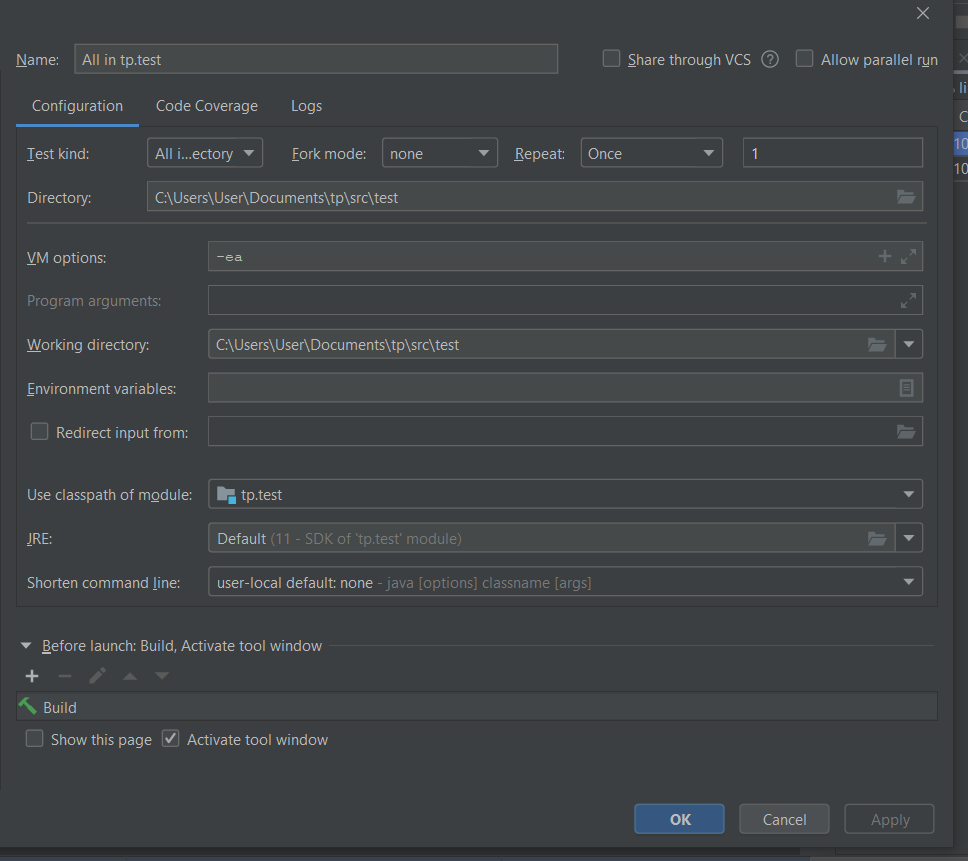
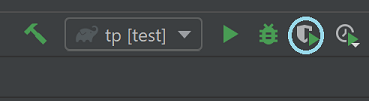
To run all tests, right-click on the src/test/java folder and choose Run ‘All in ‘tp.tests’’ with coverage This allows for you to see which path has the test covered so that you can ensure at least 90% of the paths are covered when testing.
Alternatively, you can click on this icon to run with coverage :
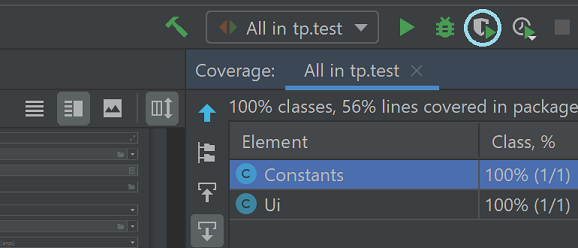
To run a subset of tests, you can right-click on a test package, test class, or a test and choose Run with coverage.
Using Gradle
Firstly ensure that the Gradle build has the following details:
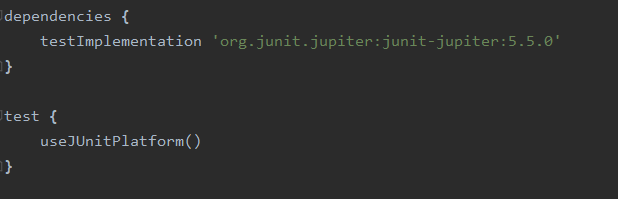
Next, to run using Gradle, you can click on the Gradle plugin icon at the left-hand side
Then click on the elephant icon (as seen below) and search for Gradle test then proceed to click on it.
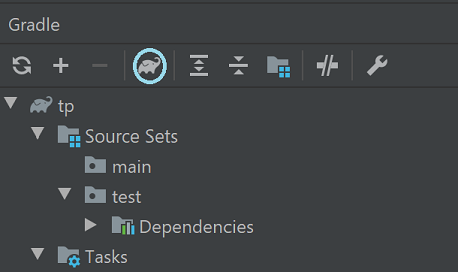
Now the configuration is set to Gradle. Proceed to click the icon: